When it comes to outdoor relaxation, nothing beats the comfort and style of well-designed deck lounge chairs. Whether you're sipping your morning coffee, soaking up the sun, or enjoying a sunset with a good book, the right chair can elevate your outdoor experience. In this article, we'll explore some creative deck lounge chair ideas and delve into the process of making your own Adirondack chair—a timeless classic that embodies both comfort and craftsmanship.
Deck Lounge Chair Ideas
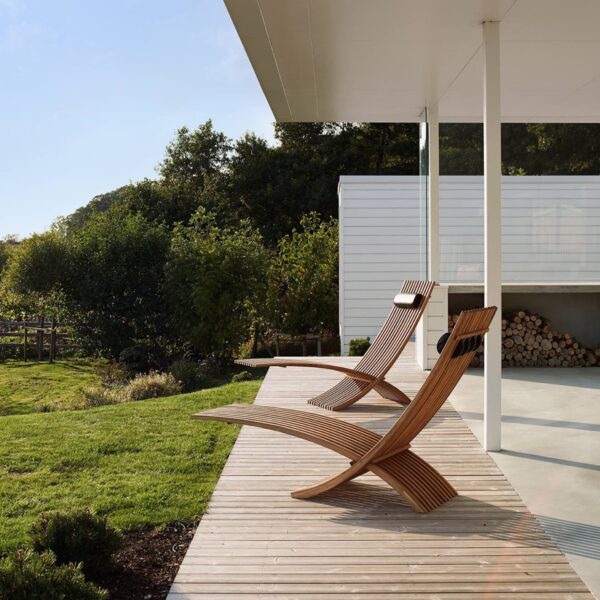
Modern Minimalist Design
- Style: Clean lines, neutral colors, and simple forms define the modern minimalist lounge chair. This style is perfect for those who prefer a sleek and uncluttered outdoor space.
- Materials: Opt for materials like aluminum, teak, or weather-resistant wicker paired with cushions in neutral tones like gray, beige, or white.
- Features: Look for adjustable backrests and foldable designs for added functionality.
Rustic Wooden Lounge Chairs
- Style: Embrace the natural beauty of wood with rustic lounge chairs. These chairs bring warmth and a touch of countryside charm to your deck.
- Materials: Cedar, teak, or pine are popular choices for their durability and weather resistance. Consider using reclaimed wood for an eco-friendly option.
- Features: Enhance comfort with thick cushions and throw blankets. Choose designs with wide armrests and sturdy frames.
Hammock-Style Lounge Chairs
- Style: For ultimate relaxation, hammock-style lounge chairs are a fantastic choice. They create a laid-back vibe and are perfect for lazy afternoons.
- Materials: Strong, weather-resistant fabrics like Sunbrella are ideal for these chairs, combined with a sturdy steel or wooden frame.
- Features: Some designs offer built-in sunshades or cup holders for added convenience.
Convertible Chaise Lounges
- Style: Versatile and functional, convertible chaise lounges can transition from a flat lounger to a sitting chair with ease.
- Materials: Aluminum or steel frames with mesh fabric for breathability. Some designs also incorporate wood accents for added warmth.
- Features: Look for models with wheels for easy mobility and adjustable headrests.
Adirondack Loungers
- Style: Combining the classic look of Adirondack chairs with the comfort of a lounge chair, these pieces are both stylish and ergonomic.
- Materials: Traditionally made from wood, but modern versions also come in durable plastic or composite materials.
- Features: Contoured seats, wide armrests, and an angled back for comfort. Some designs include footrests for full-body relaxation.
Adirondack Chair Making: A Step-by-Step Guide
Crafting your own Adirondack chair can be a rewarding project, giving you a functional and stylish piece for your outdoor space. Here's a step-by-step guide to help you get started.
Gather Materials and Tools
- Materials: Choose a durable wood like cedar, pine, or teak. You'll need planks for the back, seat, arms, legs, and supports.
- Tools: Basic woodworking tools such as a saw, drill, measuring tape, clamps, sandpaper, and a screwdriver are essential. You'll also need wood screws, wood glue, and a finish like paint or varnish.
Plan and Measure
- Start by finding a reliable blueprint or plan for an Adirondack chair. These can often be found online or in woodworking books.
- Measure and cut your wood according to the plan. Accuracy is key, so take your time to ensure all pieces are cut to the correct dimensions.
Construct the Frame
- Begin by assembling the legs and supports. Attach the front legs to the seat supports, making sure they are level and sturdy.
- Next, attach the back legs and the rear support piece. This will form the basic frame of your chair.
Attach the Seat and Back Slats
- Secure the seat slats to the frame, spacing them evenly. Use screws and wood glue for a strong hold.
- Attach the back slats, starting from the bottom and working your way up. Make sure they are evenly spaced and angled for comfort.
Add the Armrests and Finishing Touches
- Attach the armrests to the top of the front legs and back supports. These should be wide enough to comfortably rest your arms or even hold a drink.
- Sand the entire chair to smooth out any rough edges or splinters. Apply your chosen finish to protect the wood and enhance its appearance.
Final Assembly and Testing
- Ensure all screws and joints are tight and secure. Give your chair a good shake to test its stability.
- Once you're satisfied, place the chair in your desired location, sit back, and enjoy the fruits of your labor!
Conclusion
Whether you choose to buy a stylish deck lounge chair or take on the project of making your own Adirondack chair, the result is the same: a comfortable and inviting outdoor space perfect for relaxation. With these ideas and tips, you're well on your way to creating the perfect retreat right in your backyard. Happy lounging!

0 comments:
Post a Comment